
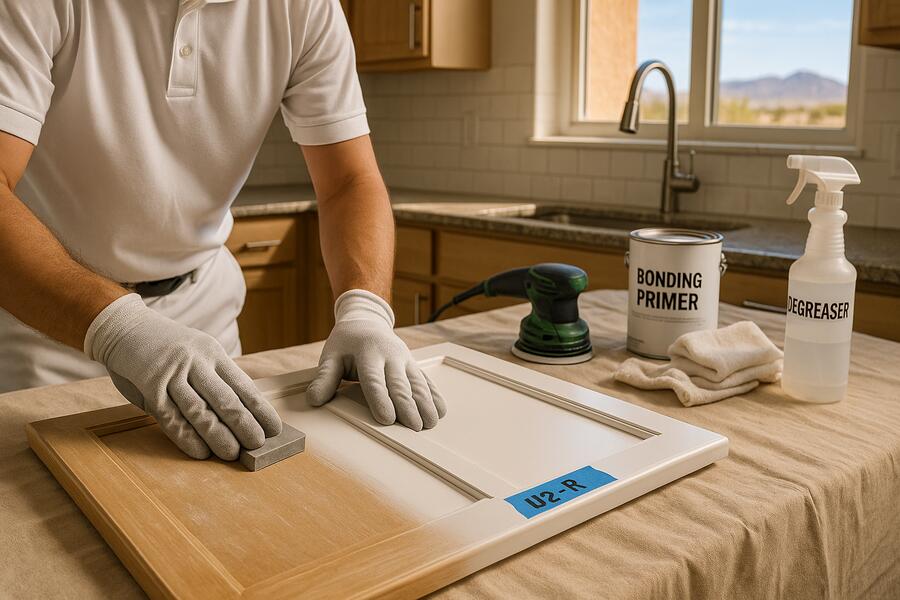
Repainting cabinets can dramatically transform a kitchen, bathroom, or any space with built-in storage. However, the secret to a professional, durable, and long-lasting finish lies not in the final coat of paint, but in the meticulous preparation that precedes it. Skipping or cutting corners on prep work is the fastest way to a disappointing result. Understanding exactly how cabinets are prepped before painting is crucial for anyone considering this popular home improvement project.
At Pro Tech Painting, we emphasize that cabinet painting is 90% preparation and 10% painting. Our detailed prep process ensures that the paint adheres perfectly, looks smooth, and withstands daily wear and tear for years. This guide will walk you through the essential steps that professional painters take to prepare cabinets, guaranteeing a beautiful and durable finish.
💡 Key Takeaway: Thorough preparation, not just painting, is the cornerstone of a durable, professional cabinet finish. Rushing prep leads to poor adhesion and a short-lived result.
The Critical Steps for Flawless Cabinet Preparation
1. Clear Out and Disassemble
The first step is to create a clean, accessible workspace:
- Empty Everything: Remove all items from inside the cabinets and drawers. This includes shelf liners, dishes, utensils, and small appliances from countertops.
- Remove Hardware: Take off all knobs, pulls, and hinges from doors and drawer fronts. Keep these organized and labeled, especially if you plan to reuse them.
- Remove Doors and Drawers: Carefully unhinge all cabinet doors and remove drawer fronts from their boxes. This allows for easier access to all surfaces and ensures a consistent finish. Label each door and drawer with painter’s tape to indicate its original position. A simple numbering system (e.g., “U1-L” for Upper Cabinet 1, Left Door) can be invaluable during reinstallation.
- Protect the Area: Lay down drop cloths over floors and countertops. Use painter’s tape to mask off any areas that won’t be painted, such as walls, appliances, and backsplashes. Two layers of tape are often recommended for appliances to prevent bleed-through.
2. Deep Cleaning and Degreasing
Cabinets, especially in kitchens, accumulate grease, grime, and residue that must be thoroughly removed for paint adhesion:
- Vacuum Debris: Start by vacuuming any loose dust or crumbs from inside and outside the cabinet boxes.
- Degrease: This is arguably the most crucial cleaning step. Use a high-quality degreaser like TSP (trisodium phosphate) substitute or a strong cabinet-specific degreaser. For extremely greasy areas, a scrub brush or even a toothbrush for corners can be helpful.
- Thorough Rinse: After degreasing, wipe down all surfaces multiple times with clean, damp cloths to remove all traces of cleaner residue. Any remaining residue can interfere with paint adhesion.
- Dry Completely: Allow all cabinet surfaces to dry thoroughly before moving to the next step. Moisture is detrimental to paint adhesion.
💡 Key Takeaway: Disassemble cabinets, label all parts, and meticulously deep clean and degrease all surfaces. Any remaining grease or grime will compromise paint adhesion.
3. Repair, Sand, and Prime
These steps create a smooth, sound surface for the paint to bond to:
- Inspect and Repair: Examine all surfaces for holes, dents, cracks, or peeling laminate. Fill small holes or dings with wood filler, allowing it to dry completely. Sand smooth afterward. Address any larger structural issues.
- Sanding for Adhesion: Even if your cabinets appear smooth, light sanding is essential to create a “tooth” for the primer to grip onto. Use a medium-grit sandpaper (100-150 grit) to scuff all surfaces, including edges and corners. You don’t need to sand down to bare wood, just enough to dull any existing sheen.
- Dust Removal: After sanding, thoroughly clean all surfaces again to remove every speck of sanding dust. Use a vacuum with a brush attachment, followed by a tack cloth, ensuring no residue remains. This step is critical; dust can create bumps and poor adhesion.
- Priming: Apply a high-quality bonding primer designed for cabinets. Primer creates an even, adhesive base for your topcoats and helps block stains and odors. Some primers can also help seal wood grain. For the best cabinet painting phoenix az, we recommend two thin coats of primer, lightly sanding between coats if necessary, and carefully removing dust after each sanding.
| Prep Step | Purpose | Key Actions |
|---|---|---|
| Disassembly & Protection | Ensures full access and prevents damage to other areas. | Empty, remove hardware, label doors/drawers, cover floors/counters. |
| Deep Cleaning | Removes grease, grime, and contaminants for proper adhesion. | Vacuum, degrease with specialized cleaner, rinse thoroughly, dry completely. |
| Repair & Sanding | Creates a smooth surface and “tooth” for primer adhesion. | Fill imperfections, sand smooth (100-150 grit), remove all dust. |
| Priming | Establishes a uniform, adhesive base for topcoats. | Apply 1-2 coats of bonding primer, light sand/dust between coats. |
💡 Key Takeaway: After repairs, sand all surfaces to create a “tooth” for primer, meticulously remove all dust, and apply a high-quality bonding primer to ensure optimal paint adhesion and a smooth final finish.
The extensive preparation involved in cabinet painting is truly the backbone of a successful outcome. While time-consuming, each step is vital to ensure your painted cabinets not only look stunning but also withstand the rigors of daily use for years to come. Investing in proper preparation saves you from the frustration of peeling paint and frequent touch-ups down the line. When executed correctly, the transformation is truly remarkable, adding significant value and beauty to your home.
Have questions about how to scheduling commercial painting around business hours? Reach out to our team today.
Frequently Asked Questions About Cabinet Preparation
Do I really need to sand my cabinets before painting?
Yes, sanding is almost always necessary. Even if your cabinets have a smooth finish, a light scuff sanding (often with 100-150 grit sandpaper) dulls the surface and creates a “tooth” that allows the primer and subsequent paint coats to adhere properly. Skipping this step can lead to paint peeling or chipping prematurely.
What kind of cleaner should I use to degrease cabinets?
For kitchen cabinets, a strong degreaser is crucial. Options include TSP (trisodium phosphate) substitute, specialized cabinet degreasers, or even a strong solution of dish soap (like Dawn) for lighter grease. Always follow the product instructions, wear gloves, and rinse thoroughly with clean water afterward to remove all residue.
Can I skip primer if my paint has “primer + paint” in one?
While “paint + primer in one” products are convenient for walls, they are generally not recommended for cabinet painting. Cabinets require a dedicated, high-quality bonding primer to ensure maximum adhesion over existing finishes and to create a uniform surface for the topcoats. The “primer” component in all-in-one paints is often insufficient for the demanding surface of cabinets.
How long does cabinet prep usually take?
For an average-sized kitchen, thorough cabinet preparation can take anywhere from two to three full days, sometimes more if extensive repairs or grain filling on oak cabinets are required. This includes disassembly, cleaning, degreasing, drying, repairs, sanding, dust removal, and priming. It’s a labor-intensive process, but essential for a professional finish.
